Last time we started work on the title slide for our slideshow. So load it up (or create it as per the last post)
It looks pretty basic at the moment so look at the picture below and we will work to producing this.

Firstly, choose another background, which is easily and quickly done, by looking to the right side column, under 'Tasks \ Master Pages'. Look at the 'Available for Use' section (if you only see the grey bar with a '+' then left click on the '+' to expand the section - note the '+' turns to a '-'). Now click on the background you want to use.
Now lets add a picture, to do this, we will be using the 3 shape icon on the bottom toolbar (see picture below)
 |
| The bottom toolbar - below the main slide window |
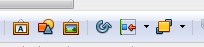 |
| Here you can see the 3 shape icon (second from the left) |
Click on the 3 shape icon and locate a suitable picture (perhaps one you have created or one from the internet - free of charge and royalties images only). Select the image and then click the 'Open' button and wait a few seconds.
The picture will arrive but not in the position you want to place it, see the picture below
 |
| The picture was deliver in the centre of the slide, note the green 'handles' for re-sizing the picture |
Use the corner handles to reduce both height and width together, the mid line handles just re-size the sides, top or bottom (depending on which handle you use - use top for top etc).
To use the handles place the mouse cursor on the handle of choice (the cursor changes to a black outlined, white double headed arrow), and HOLD down the left mouse button, now move the mouse to resize the picture and let go of the button when you have got the width, height or width & height you want.
Ok from the picture above you can see I have added a balloon callout
Click on the black arrow tip to the right of the balloon (callout) icon and select (by left clicking on the shape you want). The mouse cursor will now turn to a black cross when on the slide. Position the cursor where you would like to put the callout and HOLD down the left mouse button. Now move the mouse (while holding down the left mouse button) and the callout will form under the cursor as you move. Note the callout has the green handles for resizing and a yellow handle which directs the length and direction of the callout source.
Click inside the callout and add the text you want to display.
Play with this and we will look at slide two and transitions next time
Thank You for stopping by Prometheus1618
 |
| I have added a balloon callout to this slide |
 |
| Callout from the bottom toolbar (4th icon in from the left) |
Click inside the callout and add the text you want to display.
Play with this and we will look at slide two and transitions next time
Thank You for stopping by Prometheus1618


