Amazon

Showing posts with label Office suite. Show all posts

Monday, 26 July 2010

Your First Open Office Spreadsheet - Part 3 - Formatting 2

Hi People,
     As promised the screen shot of the initial formatted spreadsheet, with the 12/03/10 example in the cell A3.
And Ooops a small error here, can you spot it?


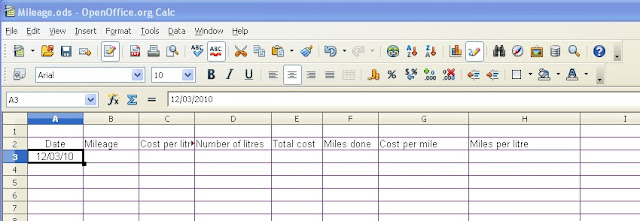
For those of you who spotted it, you are observant, well done (the 'C' columm has not been widened sufficiently to see all the heading).  

OK, now we will get into the remaining formatting.  For this as there are a number of similar formatting items, we will go through it for the first instance and then you can finish the formatting in the remaining columns as per the table in the last blog item.

Right to set the 'B' column (mileage) to a number format with no decimal places, right click on the 'B' column header.  Now left click on 'Format cells....'.  From the 'Numbers' tab, left click on 'Number' under Category, then using the scroll bar (little blue up and down arrow heads) for the 'Decimal places' box (under the 'Options' section), set the value to '0'.  

Note here you will also notice two tick boxes which when ticked (click in the box to make this happen), make either 'Negative numbers red' or 'Thousands separator' appear.  You will also notice the 'Format code' area shows the invisible code which would be placed in the spreadsheet to make this happen. 

A further point is the 'Leading zeros' option (setting this to '0' in the 'Leading zeros' box with the scroll bar would leave blank spaces in cells containing number formats - this is useful for those occasions where a cell contains a calculation, but no values to work with - we will see this later)

On to column 'C' and its setting for currency.  This setting has an automatic two decimal place setting and the currency symbol of your choice (default is the country setting for your operating system - £ for UK, $ for US etc).  So from the 'Format Cells' window (right click on column 'C' and select 'Format cells....'), left click on Currency and a number of options are automatically set for you (the negative numbers, thousands separator and their values).  Left click on the 'OK' button.

The remaining columns are very similar in format, and with exception to column 'G', it will be a repetition of some the instructions above or in the last part of the previous blog.  For the purposes of practice it will be left to you to set the formats for columns 'D', 'E', 'F' and 'H' (refer to the previous blog for the actual values and settings to make).

With column 'G' we have an additional formatting option, not seen in the others (setting the column and this includes the column heading 'Cost per mile' to a bold format).  Once again, right click on column 'G', 'Format cells....'.  Left click on the 'Font' tab, from here you can set the 'Font' style, its 'Typeface' and the 'Size'.  Leave the 'Font' and 'Size' options as they are, but left click on the 'Bold' option under 'Typeface'.  Left click on the 'Numbers' tab and set the values to 'number' and '2' decimal places.

To show what has been done put the following values into the cell shown  (e.g.  4.83 [D3]  means put 4.83 into cell D3)

26/07 [A3]
32098 [B3]
1.19 [C3]
29.7 [D3]
249 [F3]
We have missed out cells E3, G3 and H3 as these will be calculated (see below)

Mileage spreadsheet after formatting and adding dummy figures

That's it for this time, see you next time

Prometheus1618


We now have a FREE SPYWARE REPORT available, yours to keep and share if you wish. Fill in your details below and get yours now

eMail address:
First Name:

Wednesday, 30 June 2010

Why Use Openoffice.org Suite

Hello and welcome

This is the first of many help blog items on OpenOffice.org

Who is this blog for?

Well anyone wishing to use the OpenOffice.org suite and wants information on how to get to grips with various parts of it.
Please note that it is a FREE OFFICE SUITE (MICROSOFT OFFICE COMPATIBLE)

The suite is open source and is permanently under development. There are also a number of extensions to enhance various aspects of the programs.

To get your copy (it is a large download 141MB - at the date of this post the version 3.2.1 is available), click the blue link below

Get OpenOffice.org suite here

It is FREE FOR BUSINESSES, CHARITIES, SCHOOLS, COLLEGES AND PRIVATE INDIVIDUALS so anyone can use it. The program has many of the features present in other more well known office programs - databases excepted (though the database option is good for most types of database work, it has its limitations).

Install the program, making sure you read carefully the various options available at each stage of the installation.

The office suite appears as one program (i.e. it is totally integrated) On clicking the OpenOffice.org icon from the desktop, you will be greeted with a 'dashboard' window with a 'Welcome to OpenOffice.org' greeting and an 'Open a new document' option list of six types. From this window you may also directly access 'Templates' and 'Open a document'.

For now please click on the 'Tools' option in the menu bar at the top. Here there are a number of tool options. Selecting the 'Options...' option, displays a 'Options - OpenOffice.org - User Data' titled window.

There is a pane to the right for optional user data to be input and in the left hand pane a few more options under the 'OpenOffice.org' headed, list. You may wish to explore this area later, but for now click on the '+' sign to the left of 'Load and Save'.

This displays 4 options, click on the 'Microsoft Office' option and in the right pane there are 3 columns and 4 rows. The first two columns are headed, [L] and [S] and have little boxes in the rows underneath. In the non-headed third column, there is a short description on what the boxes (if ticked) will do. Go ahead and tick ALL the boxes, to get maximum compatibility with Microsoft Office files. Do not click the 'OK' or any other button just yet.

You may now read and write Microsoft Office Word, Excel and Powerpoint files

Now for another option, click the '+' sign on the left of 'Language Settings' and click on 'Languages' from the two item list. Set the language settings appropriate to your requirements here, by using the dropdown box selection arrows to the right of each selection box.

Now you can Click the OK button when done or explore the other options available to you on this window.

That's all for now people, I hope this helped you and look forward to any comments, questions or queries.